GNU Octave 4 auf Mac OS X El-Capitan installieren
GNU Octave auf einem Macintosh zu installieren ist im Vergleich zu Microsoft Windows® oder GNU/Linux nicht durch die Ausführung eines Installers getan.
Fertige App Bundles sind kaum verfügbar, veraltet oder laufen nicht zuverlässig. Die Installation über Paketmanager, wie MacPorts oder Home Brew laufen oft nicht out-of-the-box.
Nachtrag: Für aktuellere macOS-Versionen gibt es mittlerweile lauffähige App-Bundles unter octave-app.org.
Dieses How-To beschreibt, wie man Octave 4.0.3 über MacPorts (Version 2.3.4) auf El Capitan installiert.
Das alte How-To GNU Octave 3 auf Mac OS X El-Capitan installieren ist damit obsolet.
In der englischsprachigen Octave Wiki habe ich die nachfolgende Hinweise in einer Kurzfassung bereits eingepflegt. Hier findest du das ausführliche How-To.
Zuallererst, nimm dir viel Zeit. Die Installation dauert sehr lange und die benötigten Kompilierungen können schon mal etliche Stunden dauern.
Über MacPorts
MacPorts ist ein Paketmanager, der sich an BSD-UNIX orientiert. Es stellt Pakete, sogenannte Ports, zur Verfügung. Diese enthalten (UNIX) Programme, die Apple nicht mitliefert. Diese Ports enthalten „nur“ die Quellcodes der Programme. D.h. nach dem Download müssen sie noch kompiliert (in Maschinensprache übersetzt) werden. Das dauert länger, als die Installation eines bereits kompilierten App Bundles. Aber keine Angst: Diese Kompilierungen werden semi-automatisch mit ein paar Befehlen durchgeführt.
MacPorts selbst und alle Ports werden im Verzeichnis /opt/local installiert, das aber über den Finder nicht direkt sichtbar ist. Bei Programmen mit graphischer Oberfläche werden aber i.d.R. App Bundles im Ordner „Programme“ abgelegt, die den Aufruf dieser Programme stark erleichtern.
MacPorts installieren
- Wir brauchen zuerst Apples „Xcode Developer Tools“. Seit OS X 10.9 (Mavericks) muss man Xcode nicht mehr vorher installieren, wenn man die „Xcode Developer Tools“ benötigt. Öffne das Terminal (Ordner Programme|Dienstprogramme) und gebe folgenden Befehl ein:
xcode-select --install
und folge den Anweisungen, um die Tools zu installieren . Dann noch
sudo xcodebuild -license
eingeben und mit „agree“ und ENTER bestätigen.
- Downloade jetzt MacPorts für deine Mac OS X-Version und führe den PKG-Installer aus.
- MacPorts befindet sich jetzt auf deinem System.
Den „Octave“ Port installieren
Einfache Installation
Der neue Octave 4.0.3 Port sollte mit
sudo port install octave
für die meisten Anwender out-of-the-box funktionieren. Es gibt aber Gründe, warum die nachfolgenden Kapitel lesenswert sind.
Angepasste Installation
Der neue Octave Port wird standardmäßig mit der „accelerate“ Variante kompiliert. Da diese später Probleme bereiten kann, macht es Sinn die „atlas“ Variante zu wählen. Diese Auswahl kostet aber mehr Zeit beim Kompilieren.
- Der Port „atlas“ – eine wichtige Mathematik Bibliothek – macht bei der Installation Probleme, da er sich nicht fehlerfrei mit Apples C-Compiler „clang“ kompilieren lässt. Man muss ihn deshalb mit der Variante „gcc5“ kompilieren. Damit „atlas“ bei der Installation von Octave keinen Ärger macht, installieren wir diesen Port vorher mit der nötigen Variante. Im Terminal folgendes eingeben:
sudo port install atlas +gcc5
ACHTUNG: Die Installation/Kompilierung von „atlas“ kann auch auf moderner Hardware etliche Stunden dauern. Am besten den obigen Befehl über Nacht ausführen lassen.
- Eine weitere Abhängigkeit von Octave kann (muss aber nicht) später bei der Anwendung von Octave Probleme bereiten: „arpack“. Das ist eine weitere Mathematik-Bibliothek zur Lösung von Eigenwertproblemen in dünn besetzten Matrices. Standardmäßig wird sie – wahrscheinlich aus (Kompilier-)Zeitgründen – mit Apples accelerate Variante kompiliert. Diese enthält aber Fehler. Besser ist es „arpack“ mit „atlas“ zu kompilieren:
sudo port install arpack -accelerate+atlas
Dieser Befehl könnte auch noch nachträglich (nach der Installation von Octave) ausgeführt werden.
- Jetzt sind alle Vorbereitungen abgeschlossen und du kannst Octave selbst installieren. Es gibt mehrere Varianten. Die neue graphische Benutzeroberfläche (GUI) wird mit der Version 4.0.3 jetzt standardmäßig installiert. Um die atlas-Variante und die Java Funktionen zu implementieren, gebe folgenden Befehl ins Terminal ein:
sudo port install octave -accelerate+atlas+java
Auch die Installation von Octave kann etwas dauern, wenn auch deutlich weniger als „atlas“.
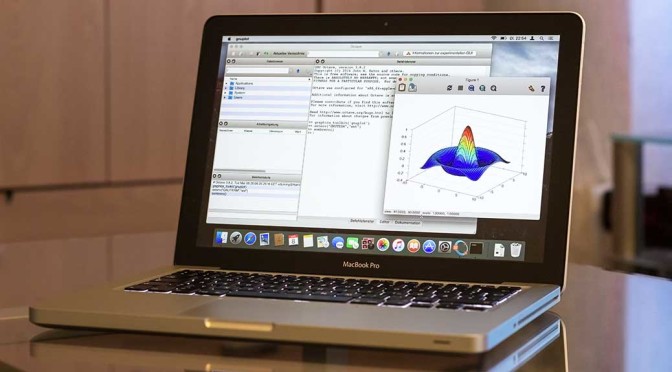
- Du findest jetzt ein Octave App Bundle im Programme Ordner und im Launchpad. Es ist aber auch möglich die Komandozeilenversion von Octave im Terminal mit Eingaben von octave zu starten.
Für die Java-Funktionalität (*dlg Dialog-Funktionen, etc) ist noch eine Java Runtime (JRE) zu installieren. Du findest sie bei Oracle.
Apples Java sollte aber auch funktionieren.
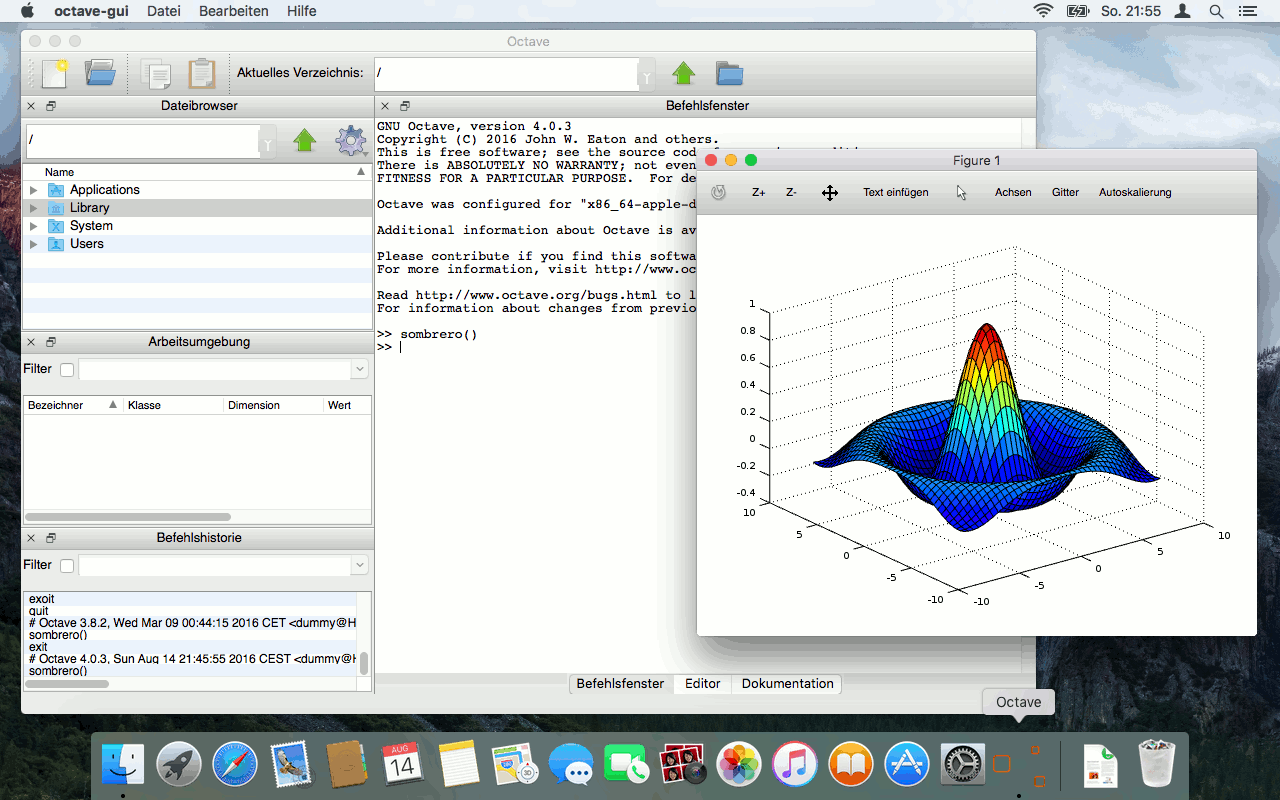
GNU Octave 4.0.3 via MacPorts
Besonderheiten
Nach dem ersten Start fallen folgende Besonderheiten – meist optischer Natur – auf:
- Der erste Plot nach dem Starten von Octave dauert deutlich länger, als mit der Version 3.8.2. Dieses Problem hat auch die Windows-Version.
- Labels in Buttons, im Editor-Submenü und anderen Widgets ist vertikal nicht zentriert. Das ist aber eher ein kosmetisches Problem (Screenshot).
Im Vergleich zur GNU/Linux- oder sogar der Windows-Version wirkt Octave auf Mac OS X ein wenig holprig, lässt sich aber sonst gut bedienen. Sie verhält sich aber besser als die Version 3.8.2.
Verbesserungen im Vergleich zu Version 3.8.3
Im Vergleich zu Octave 3.8 gibt es einige offensichtliche Verbesserungen:
- Plotten funktioniert jetzt out-of-the-box mit QT-Unterstützung.
- Octave bekommt nach dem Öffnen den Fokus und wird nicht mehr durch das aktuelle Fenster verdeckt.
- Fehlermeldungen nach dem Schließen der Einstellungsdialogbox tauchen nicht mehr auf.
- Der Befehl cd wird in der Startdatei ~/.octaverc nicht mehr ignoriert.
Probleme beim Update von 3.8.2
Bei Problemen mit dem Update aufgrund inkompatibler Varianten, siehe Octave 4 Upgrade schlägt unter MacPorts nach „port upgrade outdated“ fehl
Interessante Links
- Octaves Wiki – englisch
Hi, when I tried to do basic installation for Octave using the command „sudo port install octave“, it returns an error saying that „Error: Port octave not found“. What should I do?
Weird, try the command:
port search octaveI got a bunch of ports with „octave“ in its names
The first one is „octave @4.0.3 (math, science)“. Do you get it, too?
If not try the following while you are connected to the Internet:
sudo port selfupdate

sudo port upgrade outdated
Then try again:
port search octaveand check if you get the octave port.Then try to install octave again. But just for the case type
sudo port clean octavebefore installing Octave again. You need Internet access for the latter!When I try
„port search octave“,
it returns
„Warning: Can’t open index file for source: rsync://rsync.macports.org/release/tarballs/ports.tar
Error: search for name octave failed: No index(es) found! Have you synced your port definitions? Try running ‚port selfupdate‘.
No match for octave found“.
So I proceed to try „sudo port selfupdate“ and it shows
„—> Updating MacPorts base sources using rsync
Error: Error synchronizing MacPorts sources: command execution failed
Please run `port -v selfupdate‘ for details.
Error: /opt/local/bin/port: port selfupdate failed: Error synchronizing MacPorts sources: command execution failed
„
It sounds to me as a firewall issue. Rsync cannot reach its server (rsync://rsync.macports.org/release/tarballs/ports.tar) because a (personal) firewall blocks it.
Try another network without these restrictions, if possible. Or try to open/enable/allow port 873 (TCP) in the firewall configuration for Rsync communication.
Thanks for your help. I managed to install octave now.
Yesterday I got Octave 4.0.3_1 to install via MacPorts as above (installing atlas and airpak beforehand) onto a new macOS 10.12 Sierra machine and all seemed to work well (at least I got no significan errors and „port installed requested“ told me it got installed). Later in the day I did an „upgrade outdated“ and the system eventually choked on installing Octave 4.2.0_0 after throwing up a bunch of warnings that „All compilers are either blacklisted or unavailable; defaulting to first fallback option“. I get the same failure when doing an „upgrade“ as when doing a straight „install“, and yes I have done a „clean –all“.
A possible complication is that I have not installed the full Xcode (the machine has limited storage), just the command line tools via ?“xcode-select –install”. Virtually all of the port installations warn that „Xcode does not appear to be installed; most ports will likely fail to build.“ but up until this failed update, all of aquaterm, gcc5, gnuplot, xorg, grace and octave have installed without issue.
Has anyone managed to get Octave 4.2.0_0 installed?
I was just about to check the error log to see if it had any clues, but I foolishly „cleaned“ things, so now I have to try the 20 minute install again and see what it generates.
Hi Johann,
I still have El Capitan installed and I have not updated my ports right now because I am on travel. Furthermore I use Scilab for some (toolbox) reasons now.
Anyway, how did you installed Octave? Just „sudo port install octave“ or the version with the variants?
I guess the latter (because you installed atlas before). I think there is a incompatibility with the variants. MacPorts change the variants from version to version unfortunately. Therefor an update fails.
I had similar problems by updating Octave from 3.8.3 to 4.0.3. For help refer my how-to: https://blog.hani-ibrahim.de/en/octave4-upgrade-via-macports.html. Please be advised that you cannot use this how-to word-for-word but as an template. Check whether atlas was installed correctly, also.
Hope this helps.
Hani
My installation was:
sudo port install aquaterm
sudo port install gcc5
sudo port install gnuplot
sudo port install xorg-libXt +flat_namespace
sudo port install grace
sudo port install atlas +gcc5
sudo port install arpack -accelerate+atlas+gfortran
sudo port install qrupdate -accelerate+atlas+gcc5
sudo port install octave -gcc5+gfortran-accelerate+atlas+docs+fltk+graphicsmagick+java-gui-metis-qtgui+app+qt4gui+sound
And that all installed as expected, giving me Octave 4.0.3_1, it was the
sudo port update Octave
that failed, as has an additional
sudo port install octave -gcc5+gfortran-accelerate+atlas+docs+fltk+graphicsmagick+java-gui-metis-qtgui+app+qt4gui+sound
I’ll try an update on my Mac OS X 10.11 machine and maybe try doing a full Xcode installation, and take a more critical look at all the variants to make sure they are all playing nicely with each other.
Well, on my Mac OS X 10.11 machine, the „upgrade outdated“ resulted in a working copy of Octave 4.2.0_1 with the following warning:
unless octave is run with –no-gui-libs, graphics_toolkit(„fltk“) will cause a crash
Maybe I should give the macOS 10.12 machine another try now that 4.2.0_1 is what is current.
Well, the “upgrade outdated” worked now on macOS 10.12 and got me Octave 4.2.0_1, albeit with the crash warning.
Invoking „octave“ at the command line does fire up the octave-gui process without any crash that I see. Running „octave –no-gui-libs“ seems to get what is expected at the command line. All of this is working without the full Xcode, just the command line tools.
So it looks like it is all working without me really doing anything but waiting.
Hi Johann, I did
port selfupdate && port upgrade outdatedon my machine (Mac OS X 10.11.6) now.It ran without any problems. Octave 4.0.2 starts with some warnings (module problem) but runs as expected. But it crashes when I try to quit the program.
I found an incompatibility in my
~/.octavercfile. I renamed the file and Octave quits then properly.The problem was the call of one external module in
~/.octaverc.MacPorts will no longer install or update octave on Sierra, because of a problem with transfig. Error messages suggest that there is a (new?) conflict between transfig and fig2dev.
Same here. I did:
And the upgrade finished successfully.
As I had previously uninstalled octave, I ran your first two steps (uninstall transfig, then install fig2dev), and then I followed your „Custom Installation“ steps above. That worked. Now I can run octave from the command line, as long as I use the –no-gui-libs option, as mentioned in the MacPorts note. Trying to run from Applications, or from the command line without the –no-gui-libs option, causes the program to hang (spinning beach ball) as soon as I try anything.
Hmm, when I run Octave from the Launchpad it works as expected in GUI-Mode. But I updated Octave I did not reinstall it. I did not changed anything concerning
--no-gui-libs.I recommend to do
sudo port upgrade outdatedagain. As the hint regarding Octave appeared it did not finished its work apparently.But to be honest, I have not checked Octave properly because I switched to Scilab.
Works correctly from LaunchPad. I have no idea what is the difference, but I’m not complaining. Thanks for that suggestion.
Pingback: GNU Octave 3 auf Mac OS X El-Capitan installieren | Hanis Sammelsurium
hello after trying many other options , I looked your code was working on my el captain 10.11.6 i tried following your instruction till this
sudo port install octave -accelerate+atlas+java
after this,in the end I get this
Attempting to fetch texlive-pictures-54512_0+doc.darwin_15.noarch.tbz2 from http://atl.us.packages.macports.org/texlive-pictures
Error: Failed to archivefetch texlive-pictures: version @54512_0+doc: Could not resolve host: atl.us.packages.macports.org
Error: See /opt/local/var/macports/logs/_opt_local_var_macports_sources_rsync.macports.org_macports_release_tarballs_ports_tex_texlive-pictures/texlive-pictures/main.log for details.
Error: Follow https://guide.macports.org/#project.tickets if you believe there
is a bug.
Error: Processing of port octave failed
—> Some of the ports you installed have notes:
gawk has the following notes:
readline support has been removed from gawk. If you need to run gawk
interactively, install rlwrap:
sudo port install rlwrap
and run gawk using rlwrap:
rlwrap gawk …
grep has the following notes:
This port previously installed itself without a g* prefix, thus
overshadowing system binaries such as grep, fgrep, and egrep. The port is
now changed so that it does install with a g* prefix, like other GNU ports.
This means that you’ll now find GNU grep at /opt/local/bin/ggrep. If you
dislike typing ggrep, you can create a shell alias or you can add
/opt/local/libexec/gnubin to your PATH, wherein non-g* prefixed symlinks are
installed. In other words, /opt/local/libexec/gnubin contains GNU binaries
without any prefix to the file names, so you can type grep and get GNU grep
just as before.
hdf5 has the following notes:
Mac users may need to set the environment variable „HDF5_USE_FILE_LOCKING“
to the five-character string „FALSE“ when accessing network mounted files.
This is an application run-time setting, not a configure or build setting.
Otherwise errors such as „unable to open file“ or „HDF5 error“ may be
encountered.
legacy-support has the following notes:
To help make sure your system continues to be well represented by MacPorts,
especially if your system is not one of the latest macOS releases, please
consider installing mpstats. It will periodically send an anonymous synopsis
of your OS settings and installed ports. The information provided by this is
useful to help determine how resources are allocated.
You can install mpstats like this: sudo port install mpstats
libidn has the following notes:
Please be aware that GNU libidn2 is the successor of GNU libidn. It comes
with IDNA 2008
and TR46 implementations and also provides a compatibility layer for GNU
libidn.
libomp has the following notes:
To use this OpenMP library:
* For clang-3.8+, or clang-3.7 with +openmp variant:
add „-fopenmp“ during compilation / linking.
* For clang-3.7 without +openmp variant, use:
„-I/opt/local/include/libomp -L/opt/local/lib/libomp -fopenmp“
libpsl has the following notes:
libpsl API documentation is provided by the port ‚libpsl-docs‘.
openjdk8 has the following notes:
If you have more than one JDK installed you can make openjdk8 the default
by adding the following line to your shell profile:
export
JAVA_HOME=/Library/Java/JavaVirtualMachines/openjdk8/Contents/Home
python39 has the following notes:
To make this the default Python or Python 3 (i.e., the version run by the
‚python‘ or ‚python3‘ commands), run one or both of:
sudo port select –set python python39
sudo port select –set python3 python39
should I follow and install commods as instructed or can I ignore and continue with oracle ?
Hello, I installed all of the commands on my terminal, but I couldn’t find octave in my launchpad, and I couldn’t open it with the command octave in the terminal.
Hello, actually I do not use Octave anymore. I switched to Scilab. But I have a Octave app bundle installed on my Mojawe Mac.
To get an Octave running on you El Captain you have 2 opportunities:
1) Try the prebuild app bundles:
* https://octave-app.org/Download.html
* https://sourceforge.net/projects/octave/files/Octave%20MacOSX%20Binary/2016-07-11-binary-octave-4.0.3/octave_gui_403_appleblas.dmg/download – macOS App Bundle of Octave 4.0.3 (with GUI) (OS X 10.9+)
They were not available as I wrote the how-to. Maybe the oldest works with El Captain. If not try 2)
2) Try again with MacPorts
1. Clean the build:
sudo port clean octave2. Build it w/o variants:
sudo port install octaveIf this works your are fine.
Note: Regarding your attempt with variants
When you are really want to fine tune the build, keep in mind that dependent on the version of MacPorts the variants of a package may have changed. Therefore my how-to with the recommended variants at https://blog.hani-ibrahim.de/en/octave4-mac-os-x-el-capitan-install.html#h4 is maybe out-dated and the variants are not available anymore. You can check this with:
port variants octave.