Restore RSYNC backups of FreeNAS/NAS4Free
In my article “Backup your FreeNAS/NAS4Free shares automatically” I described how to set up automatic backups via RSYNC. To restore a entire backup of a share without altering date, owner and permissions this how-to shows you how.
Finally you just need a single command. In general you can use this command on FreeBSD as well. For GNU/Linux you may need to change just one option.
I have already used this command successfully.
Preliminary
- Run your FreeNAS/NAS4Free Server
- Set up a (new) data disk with a sufficient size in Disks|Management.
- Specify a mount point (Disks|Mount Point|Management).
- Set up the backup disk as described in points 2 and 3.
- Activate the SSH service (optional).
It is not relevant whether your server was installed “embedded” or “full”.
GUI or terminal
Unfortunately there is no tool with an graphical user interface (GUI) to do the job. Candidates as Filezilla or WinSCP failed. You have to do it in the terminal. But do not worry it is easier as you expect. You just need one command and you are done.
For this command you need to know where your backup and you empty share (where you want to copy the backup) is located in the directory tree. If you have a headless system you need further the IP address of your server.
Headless System
The mentioned SSH service above is only necessary if you use a headless FreeNAS/NAS4Free server. A headless system means no keyboard and monitor is connected to your server. Via SSH you are able to control your server from you client computer remotely.
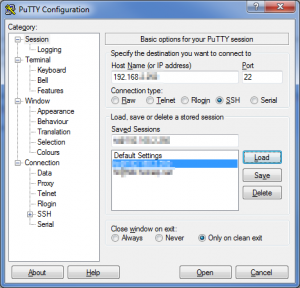
If you use Windows you can use the application Putty to do the job.
Enter the IP address of your server in “Host Name”, e.g.. 192.168.111.111. If you do not know the address Softperfect Network Scanner can help you to investigate it on Windows. On other systems you find the address in the web administration of your browser in general. Change the port number (22) if applicable. Usually it is not necessary. “Connection type” has to be “SSH”, than click “Open”
On the terminal you have to login with the Admin username (“admin” normally) and you admin password. It is the same password that you use in the web administration of FreeNAS/NAS4Free.
If you are not familiar with UNIX you may be surprised that you have to enter the password blindly. That means you do not see any asterisks or any other placeholder while you typing your password in.
If you use Mac OS X or Linux/UNIX a terminal/console is built-in. The command ssh is available by default, type in: ssh username@server-ip-address“, e.g. “ssh john@192.168.111.111“. The subsequent procedure is the same mentioned above under Windows/Putty.
Non-Headless Server
If you are sitting behind a keyboard and monitor of your server you just need to reboot it and choose 6 “Shell” from the start screen:
"Welcome to NAS4Free"
"*********************"
1) Assign Interface
2) Set LAN IP address
3) Reset WebGUI password
4) Reset to factory defaults
5) Ping host
6) Shell
7) Reboot system
8) Shutdown system
9) Install/Upgrade to hard drive/flash device, etc.
Copy data
When you finished all the preliminaries type in the following command
cp -RvLpn /path/to/source/* /path/to/destination/
Please be advised that the command and the options are case-sensitive.
If your backup you want to restore is located in /mnt/backup/myshare_bak1 and the share where you want to copy the backup in is /mnt/myshare1 the command is:
cp -RvLpn /mnt/backup/myshare_bak1/* /mnt/myshare1/
FYI: If you use GNU/Linux you have to exchange the option “-n” with”-u”:
cp -RvLpu /path/to/source/* /path/to/destination/
The options in details:
| Option | Description |
| -R | copy directories recursively, means copy subdirectories and their contents, too |
| -v | explain what is being done |
| -L | always follow symbolic links (do not copy links itself) |
| -p | preserve the specified attributes (default: mode,ownership, timestamps), if possible additional attributes: context, links, xattr, all |
| -n | copy only when the SOURCE file is newer than the destination file or when the destination file is missing (GNU/Linux: -u for update) |
You do not need all options but -R, -L and -p are essential. -v lets the names of the copied files running through the console screen. Otherwise you just see a cursor blinking. -n is just for the case that you do not want to overwrite newer files with older ones.


Pingback: Automatisches Backup von FreeNAS Verzeichnissen | Hanis Sammelsurium