Backup your FreeNAS/NAS4Free shares automatically
If you use FreeNAS or NAS4Free as a file server it is highly recommended to backup your data directories regularly. But often people do not make backups for the sake of convenience. Although it is pretty easy to setup an automated multi generation backup with FreeNAS. To avoid interfering your daily work it is reasonable to perform the backup at night.
FreeNAS uses RSYNC for data saving and syncing. Therewith you can save multiple instances of a data pool without multiply data volume (snapshot). There are only changed files saved. But in the file system it looks like that the complete data pool is multiple saved. That is done by the application of file system links.
For inexperienced users it is easy to restore files because they see an exact copy of the original file system in the backup. They just have to pick up the file/files in question and copy it back. Finally RSYNC just mirrors the data in a very smart and efficient way.
You just need a second harddisk and the script rsnc_snap_d2d.sh from the Knowledgebase of FreeNAS. Change line 24:
i=9
if you need more than 9 generations of a backup. i=9 means that nine backups will be stored till the first will be overwritten (first in, first out). If the backup is performed daily you can restore files up to an age of 9 days.
Setup the backup
This how-to is based on FreeNAS 0.69.2 (Muad’Dib).
- Connect your backup hard drive to the server and restart FreeNAS if indicated.
- Add the harddisk in FreeNAS’ Backend (Disks|Management”)
- Format the drive (Disk|Format), I recommend UFS-format
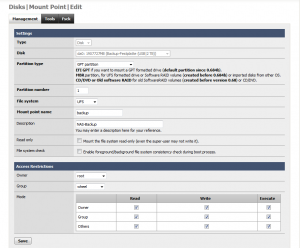
- Set a mount point (Disks|Mount Point|Management) to your drive
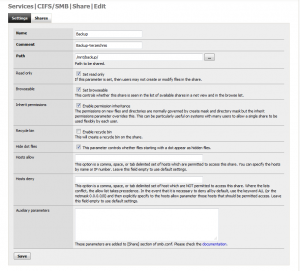
- Create a new share (Services|CIFS/SMB|Shares) so that users have access to the backuped files.
But you have to set the access to “read-only” (see screenshot above)! That is very important to avoid confusion. Because it is likely that users, if they find the file they are looking for, edit it and save it at the place where they opened it. And this place is the backup share. When they open the file again on the regular share (because they forgot that they altered the file somewhere on the backup share) they are confused that the changes did not happened. Bit they happened somewhere on the backup. If you have a lot of backup instances you will spend a lot of time to find your file with the changes you made.
You can leave the other settings as they are.
- Upload/copy rsnc_snap_d2d.sh to a share.
Important for experts: If you use SSH to upload the script, please be advised that if you store the script somewhere else in the file system and you installed FreeNAS/NAS4Free embedded, it is lost after a server reboot. Because an embedded installed FreeNAS/NAS4Free stores the core file system on a RAM disc. Just the shares (/mnt) are on the hard drives permanently. This limitation does not apply to full installations!
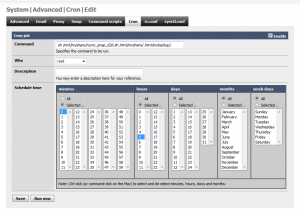
- To get the backup task done regularly you have to create a cron job (System|Advanced|Cron) with root privileges. Klick on “+” and fill out the field command, like:
sh /path/to/share/rsync_snap_d2d.sh /path/to/share/ /path/to/backupshare/
If you store the script in the root directory of the share called myshare and if the share you want to backup is also myshare and if the target share for the backup is called mybackup the command is:
sh /mnt/myshare/rsync_snap_d2d.sh /mnt/myshare/ /mnt/mybackup/
The first fraction sh of the command executes a shell. The second described the path and the name of the backup script. The third ist the path to the share you want to backup. The fourth part is the path to the backup share. You do not need to save a whole share you can just backup a folder if you like. Just specify the folder in fraction 3 of the command.
Anyway, it is sometimes reasonable to store the backup in a folder and not in the root directory of the backup share. You just have to append the name of the folder after /mnt/mybackup/. But avoid special characters – even umlauts – or blanks in the name of the share. If you can not avoid blanks, put the path in quotation marks, e.g.: “/mnt/my backup/” but not the whole command.
Because FreeNAS/NAS4Free are UNIX-System you have to keep in mind that file names and consequently paths are case-sensitive.In the screenshot below the backup will be performed every day at 5am. If you have more than one share which need backup create more cron jobs like the one above.
Restore backup
The backup above is stored in the backup share /mnt/mybackup in the directories myshare_bak1 to myshare_bak9 if the value “i” in the script is 9. myshare_bak1 contains the newest backups, myshare_bak9 the oldest. The time stamp of the directories shows which backup from which time they contain. To restore, just copy the files or folders in question back with your file manager.
Case of Average
If your harddisk is broken and you need to copy your data back on a new disk my posting Restore RSYNC backups of FreeNAS/NAS4Free will give you step-by-step instructions.
When you need your data quickly before you exchange your harddrive and copy back you backup, refer Mount FreeNAS UFS-Harddrives for details.
Related Links
- Easy Automated Snapshot-Style Backups with FreeNAS and Rsync | FreeNAS Knowledgebase
- Easy Automated Snapshot-Style Backups with Linux and Rsync | Mike Rubel
Titleimage:
Safe by Berto (CC BY-NC-SA 2.0)
BSD Daemon by
Diavolo Qqta (CC BY-NC-SA 2.0)


Super How to.
100% hilfreich 🙂
Das Netzwerkkarten dillema konnte ich auch lösen.
( Neues Mb mit andrem Chip ) 😀
Danke für Antwort.
Grüße Felix
Gutes HowTo,
ich habe nur das Problem, dass das Backup aus irgend einem Grund nur eine leere Datei erzeugt, als analog des Beispiels: “netzwerk_bak1” mit 0kb
Weiß leider nicht, woran das liegen könnte..vielleicht irgend eine Idee?
Gruß
Dennis
Aus der Ferne schwer zu sagen, Dennis.
Hast du die Scriptbefehlszeile aus 8. mal manuell in der Shell (über SSH/Putty) angestoßen? Dann bekommt man ggf. Fehlermeldungen angezeigt.
Alternativ über die FreeNAS-Weboberfläche: ERWEITERT->BEFEHL.
Die Ausgabe kannst du mir mal mailen.
Gruß Hani
Hallo,
als erstes möchte ich für dieses How To danken :). Funktioniert super. Jede Stunde macht mein Freenas Server ein Backup auf eine USB HDD. Aber ich habe noch eine Frage. Kann man es vielleicht machen das,dass Script einen Piepton von sich gibt wenn das Backup fertig ist oder eine Txt Datei in dem Backup Ordner Speichert. Danke im Vorraus
Gruß Patrick
Hallo Patrick,
Um einen Beep auszugeben, kannst du
printf "\a"oder
printf '\007'versuchen. Bei mir klappte das aber nicht. Ich glaube da müssen bestimmte Kernelmodule geladen sein. Versuchen kannst du es bei dir ja trotzdem.
Um eine leere Datei mit dem Namen “bak-fertig” im Backupverzeichnis zu erstellen:
touch /mnt/Pfad/zum/Backup-Verzeichnis/bak-fertigSetze das Kommando unten im Skript zwischen den Zeilen
touch -t `date +%Y%m%d%H%M.%S` "$2"/"$DIR"1 # --- > Set ...und
elseSinn macht es IMHO aber nicht, da die Datei beim zweiten Backup ja schon existiert. Besser wäre eine Log-Datei. Das ist aber ein bisschen aufwendiger zu programmieren, s.u.
ACHTUNG NICHT GETESTET:
if [-w bak.log]

then

   echo `date` >> bak.log

else

   touch bak.log

   echo `date` > bak.log

fi
Bitte achte darauf, dass die Ticks (`) die
dateumschließen auf der Taste links neben der BACKSPACE-Taste zusammen mit der UMSCHALT-Taste zu erreichen ist (deutsche Tastatur!). Den obigen Code an die gleiche Stelle im Skript wie oben kopieren.Zur Erklärung: Die erste Zeile prüft, ob die Log-Datei “bak.log” existiert und beschreibbar ist. Wenn ja, hängt Zeile 3 jeweils ein Zeile mit aktuellen Datum und Zeitinformationen an das Ende der Datei “bak.log” an. Wenn nicht, wird die Datei “bak.log” erzeugt und die akt. Datums-/Zeitinformationen in die erste Zeile geschrieben.
Du erhältst eine Logdatei im Textformat im gleichen Verzeichnis des Backupskripts, die in jeder Zeile das Datum und die Zeit beendeter Backups enthält.
LG Hani
@Dennis: Hatte jetzt nach 2 Jahren reibungslosem Betrieb plötzlich das gleiche Problem. Das Ausführen des Scripts direkt auf dem NAS ergab die Fehlermeldung “destination must be a directory when copying more than 1 file”. Und tatsächlich: Es wurde kein Verzeichnis angelegt sondern eine Datei mit 0Kb. Nach dem Löschen dieser Datei als root auf dem NAS funktioniert es wieder.
@Hani: Kann man erklären was da schiefläuft?
Gruss Olios
Hallo Olios,
bei mir ist der Fehler noch nie aufgetreten und wie es aussieht, ist er leider nicht reproduzierbar, oder?
Das wäre nämlich die Voraussetzung für eine zeitlich sinnvolle Fehlersuche.
Ansonsten kann man nur eine mehr oder weniger blinde Suchmaschinenrecherche nach dem allgemeinen Fehler durchführen. Evtl. ist im FreeNas/Nas4Free Forum was zu finden.
Wenn du den Fehler reproduzieren kannst, lass es mich wissen.
Gruß Hani
English translation of this article is now available!
Have fun!
Hallo,
vielen Dank für die Anleitung – wird auch bei freeNAS 9.1.0 einwandfrei ausgeführt.
Beste Grüße
Thomas
Nabend…
Ich hab das Script und die ganzen Einstellungen so vorgenommen, wie es im Tutorial angegeben ist, jedoch wird mir, egal wie ich versuch das script auszuführen gesagt, dass er es nicht öffnen kann. Ich habs sowohl über “jetzt Ausführen” unter Cron versucht, als auch manuell über Putty…
Kann irgendwie keinen Fehler finden 🙁
Hat sich erledigt. Gross- Kleinschreibung scheint im gegensatz zu Windows sehr wichtig zu sein 😉
Ja, auf Unix-Systemen sind die Dateisysteme “case-sensitiv”. Habe vorsichtshalber einen Hinweis ergänzt.
Ich hoffe, dass Du helfen kannst.
Gibt es eine Lösung für eine Online-Datenspeicherung?
Vielen Dank
Hallo Alice,
der in meinem How-To beschriebene Weg nutzt RSYNC. Das ist auch über eine TCP/IP Leitung durch das Internet möglich, soweit die Infrastruktur auf der Serverseite (beim Dienstanbieter) vorhanden ist.
AFAIK bietet z.B. einer der größten deutschen Hoster von Webspace für sein Onlinespeicher ein RSYNC Anbindung inkl. der nötigen Skripte und Datenverschlüsselung an. Ich habe mir das aber im Detail noch nicht angeschaut, da es für mich derzeit nicht in Frage kommt. Es ist auch schon mindestens zwei Jahre her, als ich das gelesen habe. Es wird sicher viele andere Anbieter geben, die dies auch anbieten.
Auch sind andere Techniken jenseits von RSYNC möglich, je nach Datenmenge und Infrastruktur. Aber RSYNC wäre für mich der erste zu prüfende Weg, wenn ich diesen denn jetzt gehen wollte.
Hallo Hani,
Du hast mir wirklich sehr geholfen – vielen Dank. Ich habe nicht gewusst, dass es Hoster gibt, die ein RSYNC Anbindung anbieten. Ich habe im Internet gesucht und es gibt z.B. rsync.net, die sich auf diese OnlineSpeicherung spezialisieren. Ich werde mich dort erkündigen.
Hallo Hani,
erstmal herzlichen Dank hat perfekt geklappt 🙂
Jetzt zu meiner Frage: und zwar fände ich es total super, wenn ich auf diese Weiße einen zweiten Nas (leider kein FreeNas/bzw Nas4free) auf dem Nas auf dem Nas4free läuft sichern kann. Ist so etwas möglich?
Lg Tobias K:
Hallo Tobias, natürlich ist das möglich. RSYNC kann auch über das Netzwerk – z.B über SSH – sichern. Das Script aus meine How-To muss natürlich angepasst werden.
Das ist aber nicht ganz so einfach. Schau erst mal hier nach: http://wiki.ubuntuusers.de/rsync und dann google mal weiter.
Eine schlüsselfertige Lösung kann ich dir nicht anbieten.
LG Hani
Hallo leute
Erst mal danke für das Tutorial, es ist (für einen Unix Anfänger) sehr hilfreich…
Jedoch macht in meinen Augen eine Datensicherung im selben Rechner nur bedingt sinn, daher meine Frage:
Kann ich die von Ihnen beschriebene Sicherung auch so einstellen, das die Sicherungsdaten auf einen anderen NAS (in einem anderen Gebäude, aber selbes Netzwerk) überträgt?
vielen Dank für die Auskunft
DM
Hallo Dave,
ja, das ist möglich. Du müsstest das Skript entsprechend anpassen, da das im Skript verwende Programm “rsync” auch über das Netzwerk (sogar verschlüsselt) auf ein anderes NAS sichern kann.
Für einen Unix-Anfänger ist das aber eher schwer bzw. zeitaufwendig mit einer extrem steilen Lernkurve umzusetzen. (siehe z.B.: http://wiki.nas-portal.org/index.php/RSYNC_zum_synchronisieren_ganzer_Verzeichnisse)
Zu deiner Anmerkung bzgl. “Datensicherung am selben Ort”:
Meine Sicherungen ist für den Homeserver-Einsatz gedacht. Eine Offsite-Sicherung halte ich persönlich da i.d. allermeisten Fällen nicht für erforderlich. Anders sieht das natürlich bei (unternehmens-)kritischen Daten aus. Hier ist eine Offsite-Sicherung dringend anzuraten, da hast du recht!
Als Unix-Novize würde ich dann aber eher zu einer kommerziellen Lösung greifen, die solche Sicherungen schon integriert haben oder zumindest “zubuchbar” anbieten oder mir professionellen Service für FreeNAS einkaufen.
LG Hani
Guten Tag
vielen Dank für diese Anleitung und das Script! Beides hat mir sehr weitergeholfen.
Eine Frage habe ich allerdings:
In meinem SOURCE Verzeichnis habe ich drei Ordner (a, b und c), die alle zu einer anderen Gruppe gehören (ga, gb und gc). Die Rechte sind so gesetzt, dass der Owner (root für alle) alles darf sowie auch die Gruppe; andere dürfen nichts.
Wenn nun das Backup ausgeführt wird, werden alle diese Ordner und deren Inhalt korrekt nach TARGET kopiert. Für den Ordner a bleiben die Besitz- und Rechteverhältnisse die gleichen (d.h. root ist Besitzer, Gruppe ist ga, root und ga dürfen alles), für die anderen Ordner b und c haben sich im Backup die Rechte geändert (root ist Besitzer, wheel ist Gruppe, root darf alles, Gruppe darf nichts).
Was könnte das Problem sein resp. wo muss ich schrauben?
Danke und Gruss
Michael
Hallo Michael, das ist komisch. Es sollten alle Ordner gleich behandelt werden. Das Skript behandelt alle Dateien und Verzeichnisse gleich. Aus der Ferne fällt mir jetzt keine Lösung ein.
Wie unterscheiden sich die Verzeichnisse “b” und “c” von “a”. Irgendwo muss es einen Unterschied geben.
Habe das Script nochmals ausgeführt, und nun funktioniert es, d.h. die Rechte sind nun korrekt übernommen worden.
Was mir aber aufgefallen ist ist, dass die Rechte für Ordner “a” bereits beim Starten des Scripts korrekt gesetzt werden, diejenigen für die Ordner “b” und “c” erst gegen Ende der Abarbeitung des Scripts. Nach vollständiger Abarbeitung stimmen dann die Rechte für alle Ordner.
Somit war beim 1. Versuch das Script wohl noch nicht ganz fertig ausgeführt.
Schön, dass es sich geklärt hat. Danke für deine Rückmeldung.
Hallo…. ganz dringend ……wenn ich im Script die Backupanzahl von i=9 auf i=2 ändere dann führ er das Script nicht mehr aus . Wenn ich das Orginalscript wieder auf den Server kopiere funktioniert das ganze aber ich brauch keine 9 Backups.
Hallo Marcus, es kann nicht an “i=2” liegen. Ich selbst hatte da 14 eingetragen.
In welchem Programm hast du die Datei bearbeitet?
Bist du sicher das die nicht die Endung “.txt” hat. Der Standard-Editor von Windows (notpad.exe) fügt in den Standardeinstellung diese Endung an alle bearbeitete Dateien an. Wenn man dann noch das standardmäßige aktivierte Ausblenden bekannter Dateieendungen dazukommt, sieht man die Endung “txt” nicht.
Ich schicke dir das modifizierte Skript mit “i=2” an deine angegebene E-Mail. Versuche es mal mit diesem Skript.
Mhh ich bin mir so ziemlich sicher das es keine txt Endung hat. Ich hatte die Datei mit dem Notepad bearbeitet. Ich hatte sogar zum Test mal den gesamten Inhalt rauskopiert habe eine Textdatei aufgemacht, das Script habe ich da rein kopiert und habe die Datei umbenannt ,habe die Datei umbenannt von . txt in .sh auch da kein Erfolg .Ich hab im Windows alle bekannten Dateiendungen einblenden lassen .Werde alles noch mal prüfen . Wenn du die Möglichkeit hast mir eine Datei zukommenzu lassen wäre ich die sehr verbunden.
Danke und weiter so eine tolle Seite .
Danke dir. Die Datei funktioniert einwandfrei.
Guten Rutsch
Freut mich, dass es funktioniert. Dir auch einen Guten Rutsch.
Hallo zusammen,
ich bin auf diese Seite gestoßen da ich eine Lösung RDX im zusammenhang mit FreeNas suche. Ich nutze das FreeNAS als Backup Archiv vom HauptBackup Server. Also als zweite Kopie vom Backup. Nun würde ich gerne das Backup auslagern mit RDX damit immer eine komplette Woche ausserhalb lagert und immer mitgenommen werden kann. Ich nutze hierzu ein HP N40L, ist ein Tandberg Data RDX Internal drive 8782-RDX kompatibel zu FreeNAS per SATA? bzw wird dieses erkannt? Wie ist der Durchsatz? ich muss täglich ca 150GB neue Daten Sichern in einer Woche kommen knapp 1,2TB zusammen inkl Full Backup Sonntags.
Grüße
Rob4ik
Leider kann ich die Fragen nicht beantworten. Ich habe keine Erfahrung mit RDX Systemen und FreeNAS. Zumal ich auch FreeNAS nicht mehr verwende.
Hani
Hallo Hani,
wollte an dieser Stelle nur mal danke sagen 🙂
Es funktioniert einwandfrei.
LG